
Phoenix summers are unforgiving. When temperatures climb past 110°F, your air conditioner is not just a comfort appliance; it is a lifeline. So when your AC starts struggling, the instinct to wait and see can turn a minor repair into a major financial disaster.
Here is what most homeowners do not realize: one of the most common reasons AC systems shut down completely in Phoenix is a failed capacitor, a small electrical component that costs a few hundred dollars to replace. Ignore the early warning signs, and that same neglected part can destroy your compressor, leaving you with a repair bill that reaches into the thousands.
This guide is designed to help you understand exactly what is happening inside your system before it fails entirely. You will learn what an AC capacitor actually does, how to recognize the warning signs of a failing one, and what professional HVAC capacitor replacement involves and costs. More importantly, you will understand why acting early is not optional in a Phoenix summer. It is the decision that separates a quick service call from a full system replacement.
What an AC Capacitor Actually Does
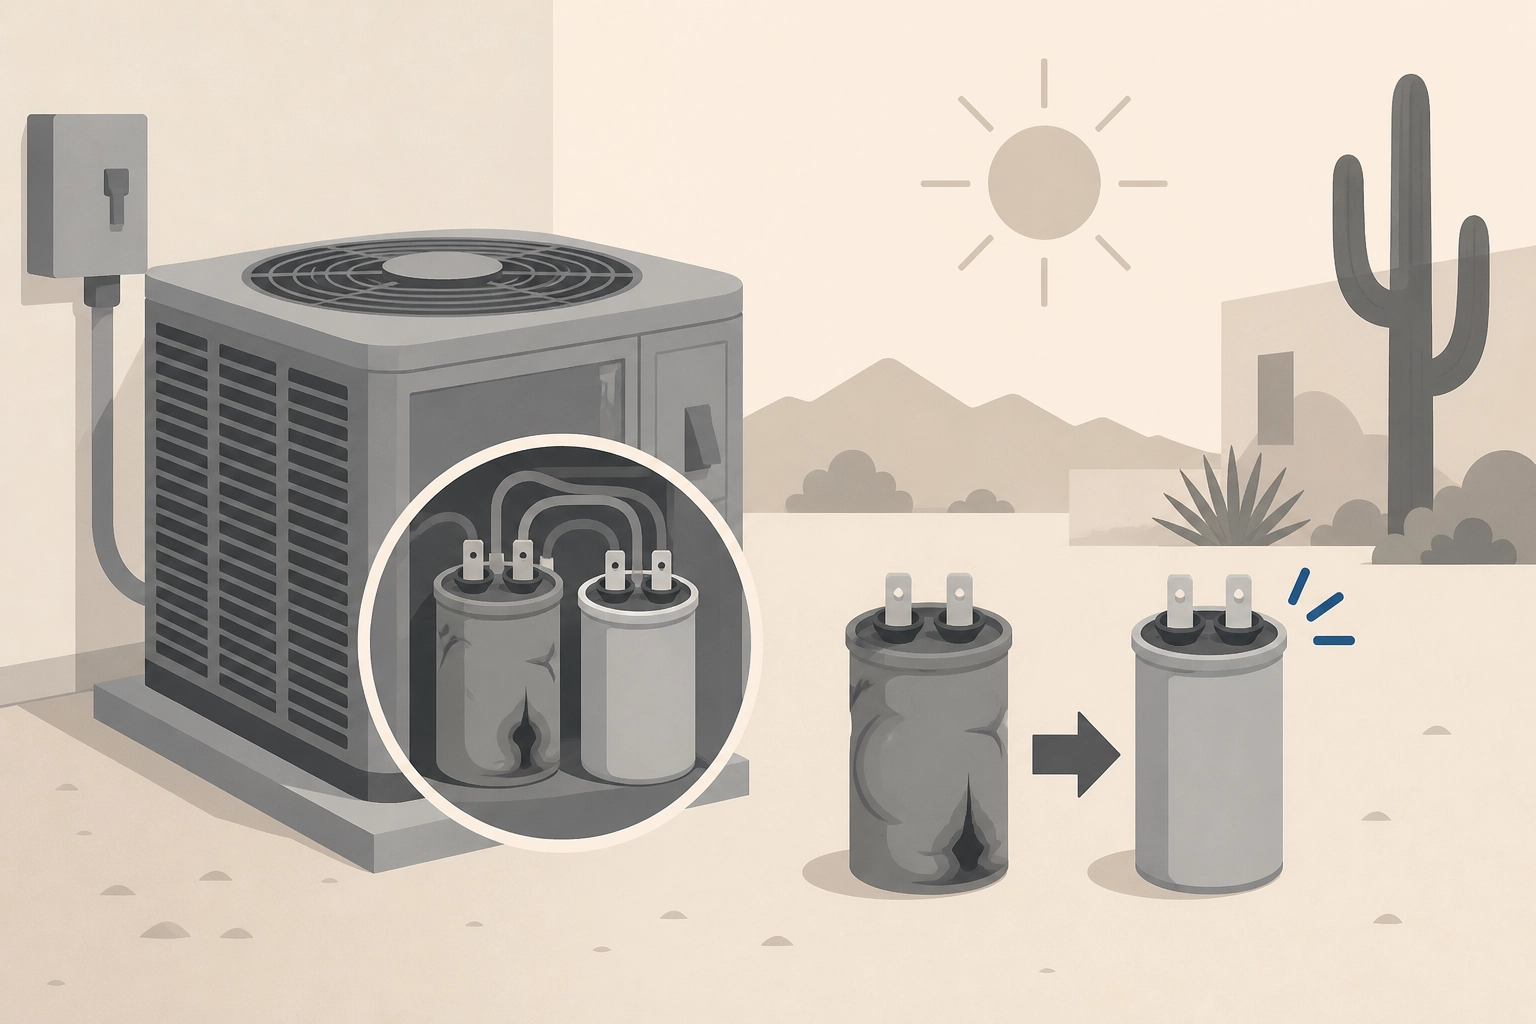
A capacitor is a small cylindrical component that stores and releases an electrical charge. Think of it as a dedicated battery whose only job is giving your AC motors the jolt they need to start and keep running. Without that electrical boost, the motors in your cooling system simply cannot do their job.
Most central AC systems rely on two types. A start capacitor delivers the surge of energy needed to get a motor spinning from a dead stop. A run capacitor sustains the motor at its rated operating speed once it's moving. Many modern units consolidate both functions into a single dual-run capacitor, which handles the compressor and condenser fan motor together. If that one component weakens, two critical parts of your system are affected simultaneously.
Here is where Phoenix changes the equation. Capacitors have a finite service life, and in Phoenix, where outdoor units absorb intense, sustained heat, that lifespan is commonly shorter than in cooler climates. Your capacitor may be failing well before you would expect it to.
When a capacitor weakens, it can no longer deliver full voltage to the motors it supports. The compressor, condenser fan, and blower do not shut down immediately; instead, they strain against the reduced electrical supply, drawing excess current on every single start cycle to compensate. That excess current generates heat inside the motors themselves, and the damage accumulates with each use.
The critical takeaway is this: capacitor failure is not sudden or random. It follows a predictable, gradual decline, which means the warning signs appear in advance. That gives you a window to act before the damage spreads to far more expensive components.
4 Warning Signs Your Capacitor Is Failing
Because that predictable decline announces itself, knowing what to listen and feel for is the difference between a quick repair and a compressor replacement.
1. Hard Starting or Delayed Startup
If your outdoor unit hesitates, hums loudly for several seconds, or takes more than one attempt to kick on, the start capacitor may no longer be delivering a full electrical boost. The motor is receiving power but cannot generate enough torque to get moving.
2. Warm or Weakly Cooled Air
A degraded run capacitor forces the compressor and condenser fan to spin below their rated speed. When that happens, the system loses its ability to reject heat efficiently, and your indoor temperature climbs even though the unit appears to be running. If your AC is on but the house is not cooling down, the problem warrants attention before it worsens.
3. Clicking or Humming from the Outdoor Unit
One click on startup is normal contactor engagement. Repeated clicking, a sustained hum with no fan blade movement, or a hum immediately followed by shutdown are different. Each pattern indicates the motor is stalling, drawing excessive current, and tripping its overload protection.
4. Short Cycling
When the capacitor cannot sustain run voltage, internal protections shut the unit off within minutes of startup. The system then restarts and repeats the cycle. Each failed attempt forces another high-amperage surge through the compressor windings, adding wear that accumulates fast.
These four symptoms can appear on their own or in combination. In a Phoenix summer, any one of them warrants fast, careful diagnosis when your AC is not keeping up within the same week, not a wait-and-see approach.
How a Failing Capacitor Destroys Your Compressor
Those warning signs matter precisely because of what they reveal about the stress building inside your system. Each hard start is not just an inconvenience; it is a damaging electrical event.
Every time a weakened capacitor forces the compressor to start without proper support, the compressor draws a current spike significantly higher than its normal operating draw, a phenomenon electricians call locked-rotor amperage (LRA). That is not a gradual strain. It is a jolt, repeated every single start cycle.
What those spikes actually do to the compressor
Each LRA event generates intense heat inside the compressor's motor windings. The windings are wrapped in a thin insulating coating that protects against electrical shorts. Under normal operation, that insulation lasts the life of the unit. Under repeated high-amperage starts, it degrades, becomes brittle, and eventually fails, causing an internal short or full burnout. The compressor does not warn you when that threshold is crossed.
Why Phoenix makes this worse
A compressor operating on a 112°F Phoenix afternoon is already near its thermal ceiling before the first hard start of the day. When the outdoor unit is also dealing with blocked or damaged airflow around the condenser, the thermal load compounds further. Cooler climates give compressors more headroom to absorb electrical stress. Phoenix does not.
The diagnostic trap homeowners fall into
A compressor in decline produces warm air and short cycling, the same symptoms as a failing capacitor. This creates a dangerous misread: the homeowner replaces the capacitor, feels briefly reassured, and misses that the compressor is already damaged.
By the time a compressor fails completely, replacement runs $800 to $2,500 or more. If the system is older, the repair-versus-replace calculation often pushes costs far higher. That compressor-saving repair is one of the lowest-cost interventions in residential HVAC.
What Capacitor Replacement Costs vs. What You Are Risking
So what does that failure actually cost in dollar terms, on both sides of the decision?
A standard capacitor replacement in Phoenix runs $150 to $350. The exact number depends on the capacitor type (single-run, dual-run, or hard-start kit), the equipment brand, and whether the call is scheduled in advance or dispatched as an emergency. Either way, it is one of the lowest-cost repairs in residential HVAC.
The alternative is not comparable. A compressor replacement on a typical 3-to-5-ton residential system runs $800 to $2,500 or more in parts and labor combined. On older systems or premium equipment, that figure climbs higher. And that cost assumes the compressor is still replaceable at a reasonable price.
There is also a warranty issue most homeowners do not anticipate. When compressor failure results from electrical stress rather than a manufacturing defect, many manufacturers exclude the claim. The homeowner absorbs the full repair bill with no offset.
The third scenario is often the most expensive. When a compressor fails on a system that is already 10 or more years old, the repair-versus-replace math frequently tips toward full system replacement, which can cost several times more. For a full breakdown of what drives those numbers, AC replacement in Phoenix covers costs, signs, and what to expect in detail.
Laid side by side, the numbers make the decision straightforward:
Capacitor replacement (scheduled): $150 to $350
Compressor replacement: $800 to $2,500+
Full system replacement: can cost several times more
A proactive capacitor swap is not just affordable; it is one of the highest-return maintenance decisions a Phoenix homeowner can make.
What to Expect During a Capacitor Replacement Visit
Knowing the cost difference is one thing; understanding what actually happens during the visit makes it easier to pick up the phone.
A technician's first move is testing the capacitor with a multimeter or dedicated capacitance meter. A healthy capacitor reads within 6% of its rated microfarad (µF) value, the number printed on the side of the part. A reading significantly below that tolerance confirms failure or imminent failure, and the technician will document it before touching anything else.
The next step is checking amperage draw on the compressor and fan motors. This matters more than most homeowners realize. A new capacitor installed on a motor that has already sustained damage from weeks of hard starting is a short-term fix at best. Measuring amp draw tells the technician whether the motors are still healthy enough to benefit from the repair or whether a deeper problem needs to be addressed first.
The replacement itself is typically a 15 to 30-minute job. The part is inexpensive, the wiring is straightforward, and a well-prepared technician will typically carry common replacement capacitors on the service vehicle. Most capacitor repairs are completed in a single visit with no return trip for parts. Gray Goat Air technicians serving the Phoenix area are equipped to handle capacitor replacements as part of their standard service.
A thorough visit goes beyond the capacitor. The technician should also check refrigerant charge, contactors, and electrical connections. Capacitor failure rarely happens in total isolation; a system that has been struggling often shows wear in adjacent components. Catching those issues during the same visit prevents a second service call a few weeks later. For a full picture of what a professional visit covers, see What a Professional AC Maintenance Visit Actually Includes.
When to Call for AC Repair in Phoenix (and When Not to Wait)
Knowing the repair is quick and affordable only helps if you act before the system forces your hand.
The best time to address a capacitor is spring, March through May. Before Phoenix temperatures push past 100°F, service schedules are open, standard rates apply, and your system has a chance to be confirmed ready for the months ahead. If you want broader context on timing major HVAC decisions around Phoenix's climate, the best time of year to schedule central AC installation in Phoenix applies the same seasonal logic.
Any warning sign during summer should be treated as same-week urgent.
One thing to take off the table entirely: DIY replacement. Capacitors store an electrical charge even after the unit is powered off. The shock risk is real and serious. This is a repair that requires a licensed technician, and the cost is low precisely because the job stays in professional hands.
Before you call, run through three quick checks:
Thermostat set to cool and below the current indoor temperature
Air filter inspected and replaced if clogged
Circuit breaker confirmed in the ON position
These take five minutes and rule out the most common non-issues. A technician can then focus directly on the actual problem.
Finally, searching for ac repair in Phoenix during a July heatwave puts you in a queue with thousands of other households in the same situation. Early action in spring, or at the first symptom, gives you scheduling options and standard pricing rather than emergency rates.
Do Not Let a $300 Problem Become a $5,000 One
The warning signs covered throughout this guide are not random glitches. They are a system asking for a repair it still has time to receive. Hard starts, clicking from the outdoor unit, warm air pushing through the vents: each one is an early signal, and in Phoenix, early signals have a short shelf life.
That same desert heat that shortens capacitor life makes delay more costly here than almost anywhere else in the country.
As covered above, the cost gap between a capacitor swap (around $150–$350) and compressor or system replacement is not marginal, it is the difference between a service call and a major capital expense.
Understanding why Phoenix HVAC systems need more maintenance than the national average helps put this in context: the desert climate is harder on every component, and capacitors are among the first to show it.
Gray Goat Air provides HVAC capacitor replacement and full AC repair service throughout the Phoenix area. If your system is showing any of the symptoms described in this guide, schedule a diagnostic visit before the heat forces the decision for you.
The best AC repair is the one that happens before the emergency. A spring tune-up or an early symptom check costs a fraction of what reactive repairs demand, and it is the single most effective step a Phoenix homeowner can take to protect a cooling system before summer begins.
Conclusion
A failing capacitor is one of the most preventable HVAC problems a Phoenix homeowner faces. The warning signs are recognizable, the repair is straightforward, and the cost is manageable when you act early. Wait too long, and a minor electrical component takes the compressor with it, compounding a modest service call into a major repair bill or a full system replacement.
The core takeaways are simple: know the symptoms, understand the stakes, and do not let the desert heat make the decision for you. Every week of delay in a Phoenix summer narrows your options.
If your system is humming, struggling to start, or running warmer than usual, schedule a diagnostic visit now. Gray Goat Air serves the Phoenix area and can identify the problem before it compounds. Protect your investment while the fix is still easy.